Visors, Part 2

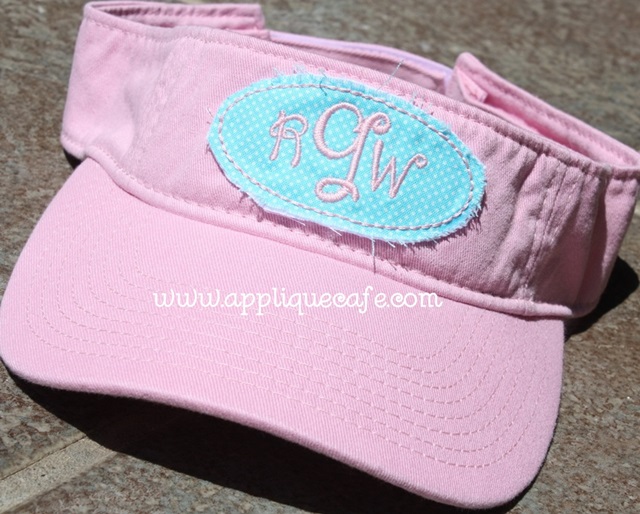
Another post! 2 in a row. This is a follow up to my previous post on MONOGRAMMING VISORS using a CAP FRAME. Check out that post if you are just tuning in. A friend brought over several youth visors today so guess what I did all afternoon? My original thought was that the 6 year old daughter would love a monogrammed visor this summer. This thought came after she wore mine at the pool yesterday. It didn’t take long for my niece to claim one (and want it monogrammed right then and there) and the boys to claim theirs too. So that’s what I did all afternoon, and I figured out a trick or two I wanted to share!

First, when using your CAP FRAME, your machine (multi needle) knows you’ve installed the cap frame on there and assumes you are monogramming hats or caps. A) When “hooping” your cap or hat on a cap frame, the hat is actually upside down on your machine. SO…. your machine automatically flips your monogram upside down. B)When “hooping” a visor using your cap frame, the visor is actually right side up. This creates a problem when your machine flips the monogram upside down. Today I found myself rotating the design to right side up several times while editing my design on my screen (selecting and assigning colors, etc.)

LIGHT BULB!!!! After the 2nd visor, I formatted my monogram in Monogram Wizard Plus and saved it on my computer. I then opened the saved monogram in Sew What Pro, rotated it upside down, and saved the file to my thumb drive to stick in my machine. Are you confused yet?? Now, when I put the upside down monogram on my machine to stitch on my visor, when I’m done editing, it will flip it upside down for me, which makes it RIGHT SIDE UP for my visor!

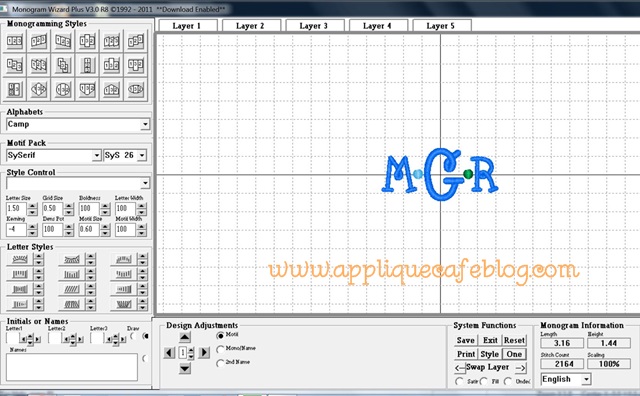
Here is my MWP screen and I used Camp font. I also inserted dots in between my letters using SySerif Motif 26 so I could use 2 thread colors on my lime green visor. If you have MWP and don’t have the free motifs (punctuation), go to the Needleheads Sewing Studio and download them for free. So I saved this file on to my computer just like this.

VISORS

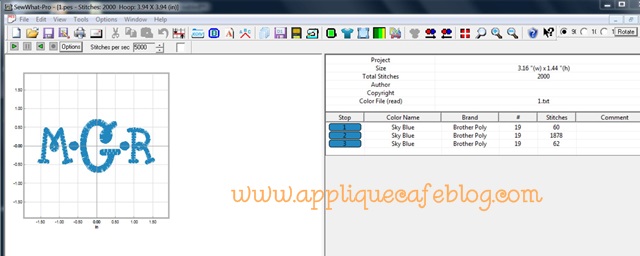
I then opened the saved file in my Sew What Pro. I couldn’t figure out a way to rotate a design upside down in MWP. If there is a way, let me know!?

visors2

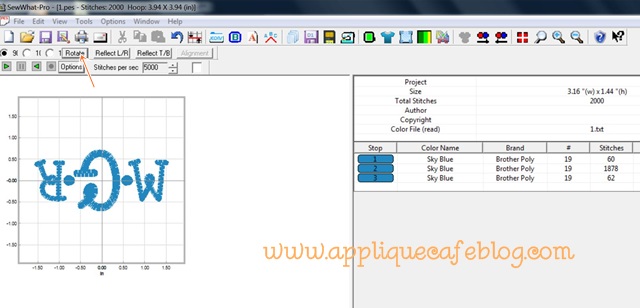
I rotated the design and saved it as upside down!

visors3

Another LIGHT BULB moment…

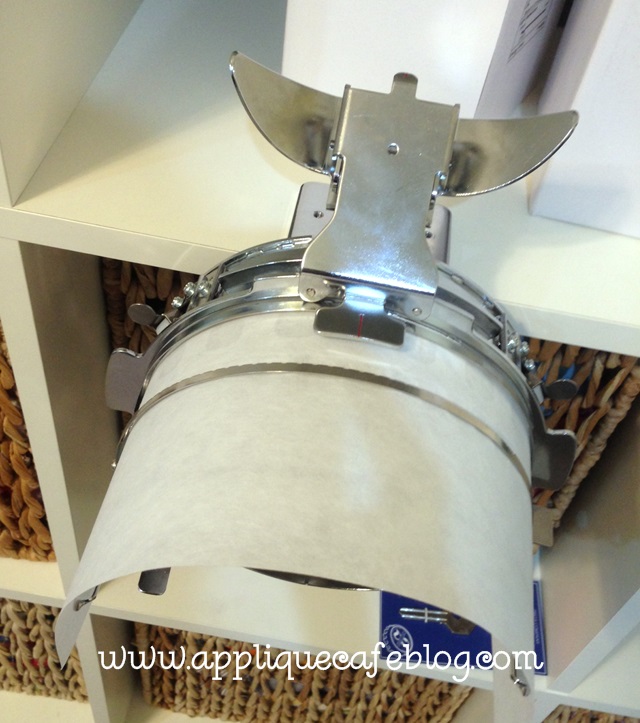
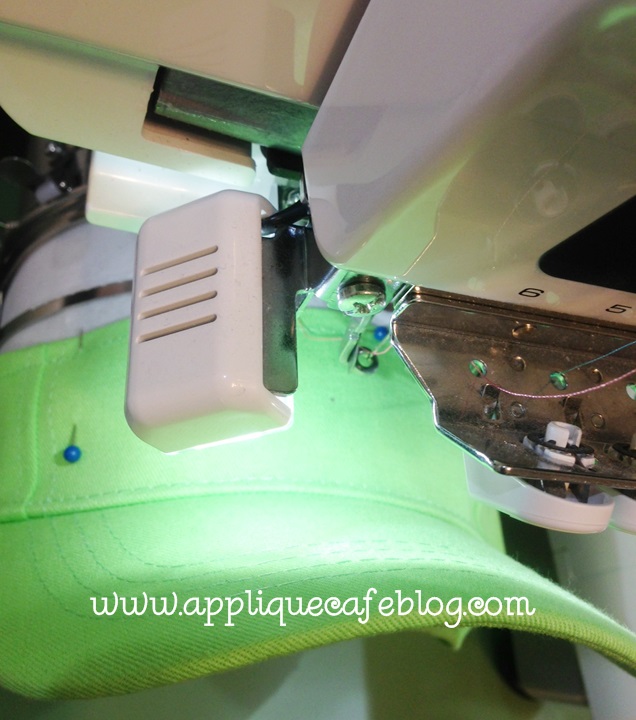
If you check out my last post on VISORS, I explain how when hooping a visor on the cap frame, the clamp that folds over barely grips the top of the visor. Here is a pic:

photo 2 (7)

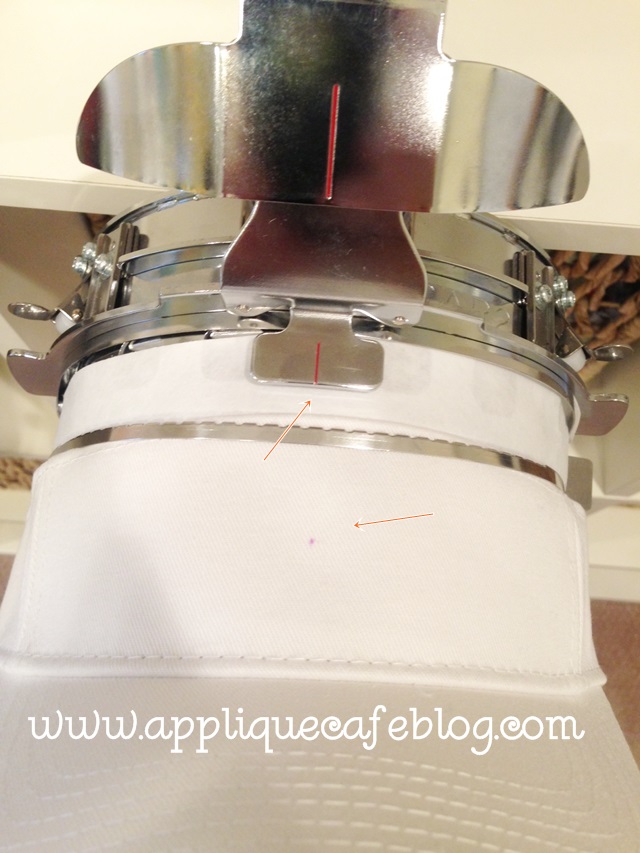
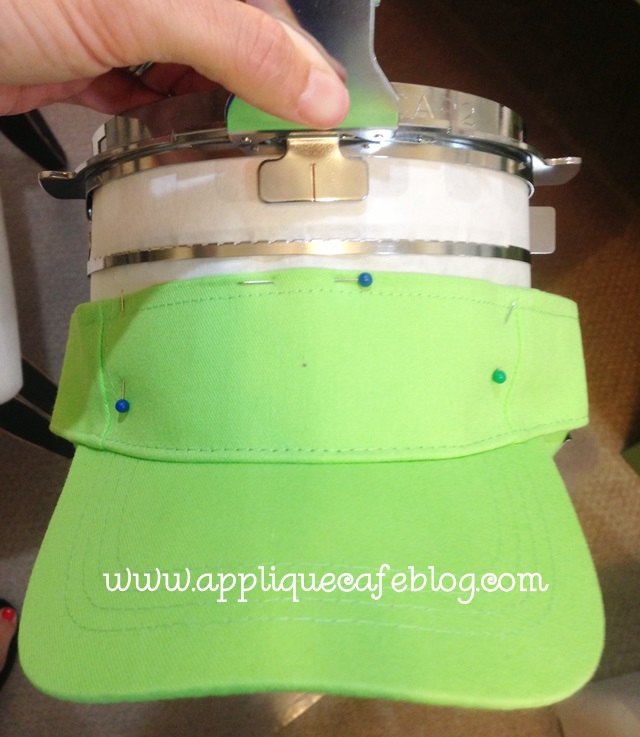
Today I found that this gives little room for your monogram on the visor. You are limited to like 2″ in height anyway, and with the visor up that high on the frame, I was having to shrink my monogram to make it fit and centered. So…. I decided to instead “hoop” the tearaway cap stabilizer strip and then pin my visor lower on the stabilizer on to the frame. It worked!! Below you can see where I clamped down my stabilizer on the frame. You can buy tearaway cap backing in pre-cut strips from sewingmachine.com.

photo 2 (6)

I then pinned the visor to the stabilizer to keep it in place. You have to be gentle and careful, but it works.

photo 3 (4)

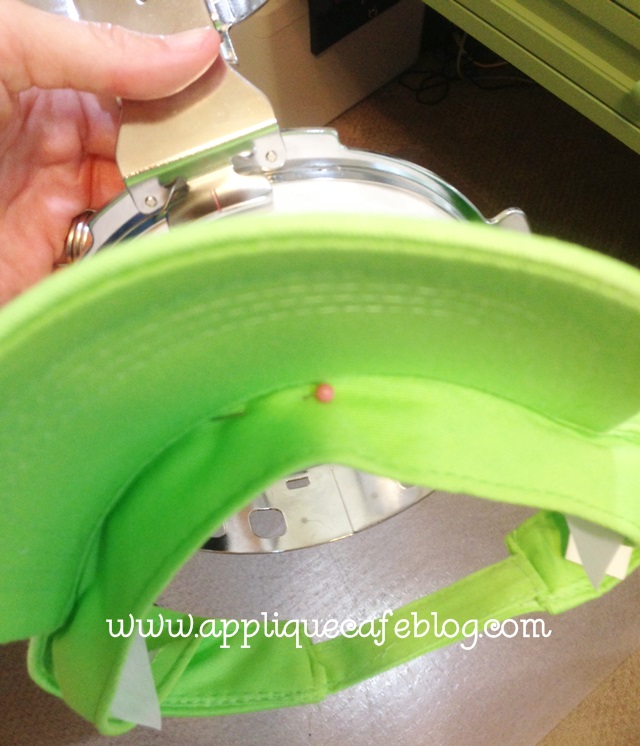
The little lining strip is folded down on the visor and I pinned that to the stabilizer also.

photo 4 (2)

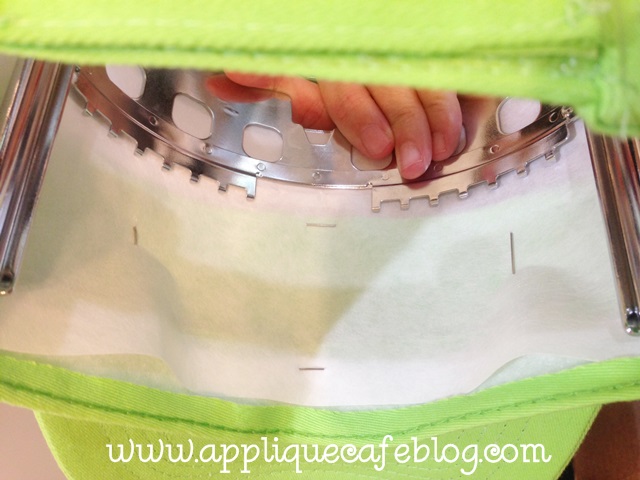
Here is what it looks like underneath. 

photo 5 (2)

Here is a shot of the visor on the frame on my machine. I will line up the needle with the center mark on my visor before sewing.

photo 2

First I want to assign colors to my monogram. As you can see below, I put the design on my machine and it’s upside down like I saved it  in SWP  and it will stay upside down for thread color editing.

photo 2 (7)

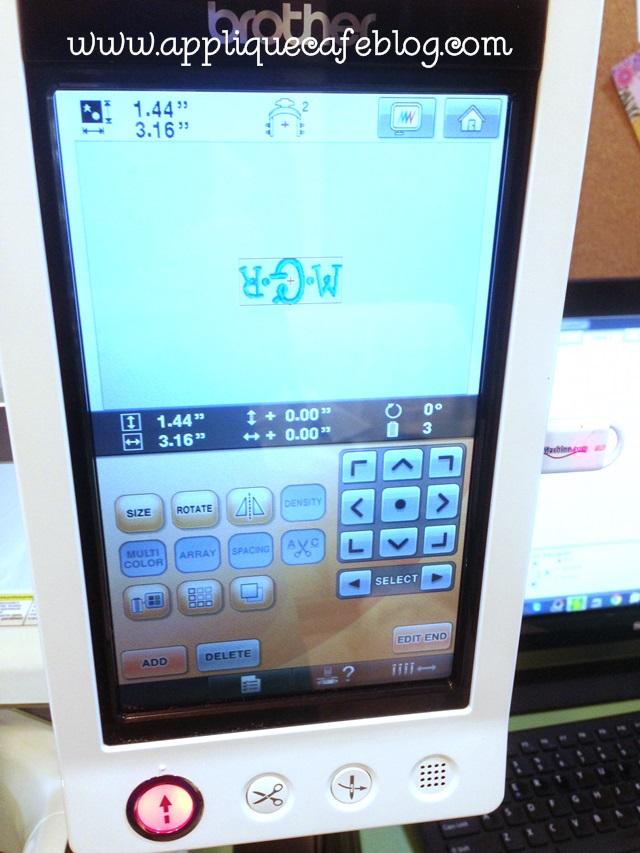
I’ve assigned my colors, hot pink letters and turquoise dots. 

photo 1 (7)

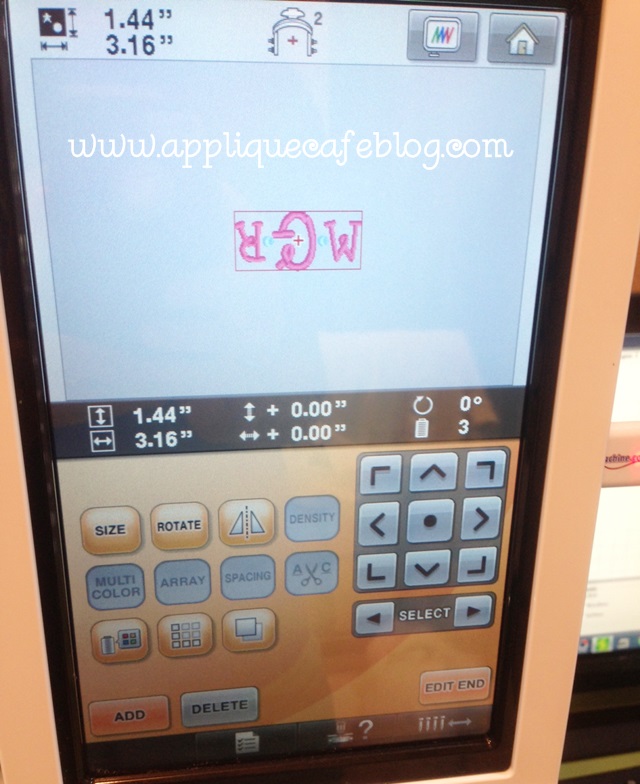
When I click Edit End, my machine automatically flips the design upside down thinking it’s a cap. For me, it flips it right side up for my visor since I saved it upside down. I line my needle up with the center mark on my visor and now I’m ready to sew!

photo 1 (6)

Here it is when it’s finished sewing. I unpin and remove all of the stabilizer.

photo 3

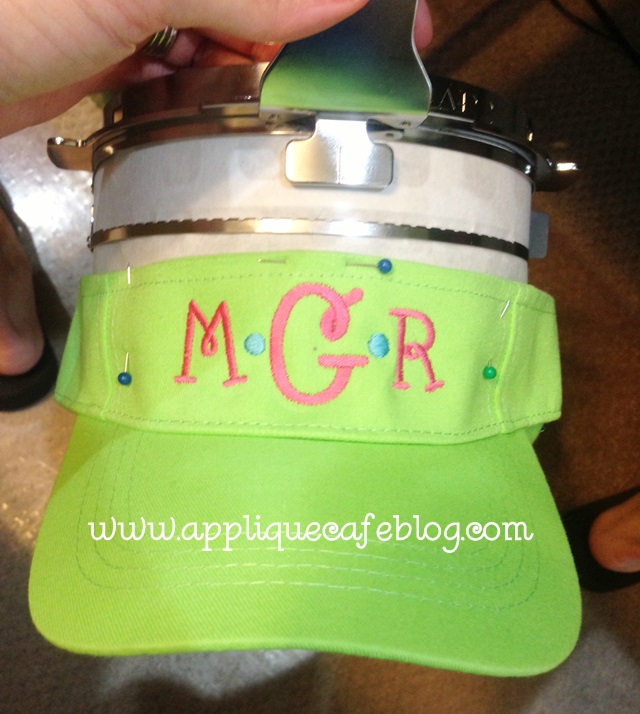
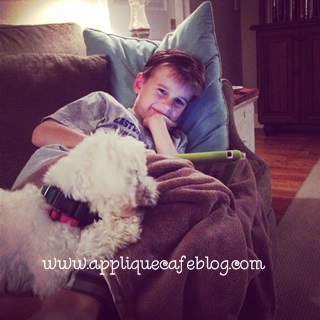
Here is my lovely assistant modeling Mallory’s new visor!

photo 4

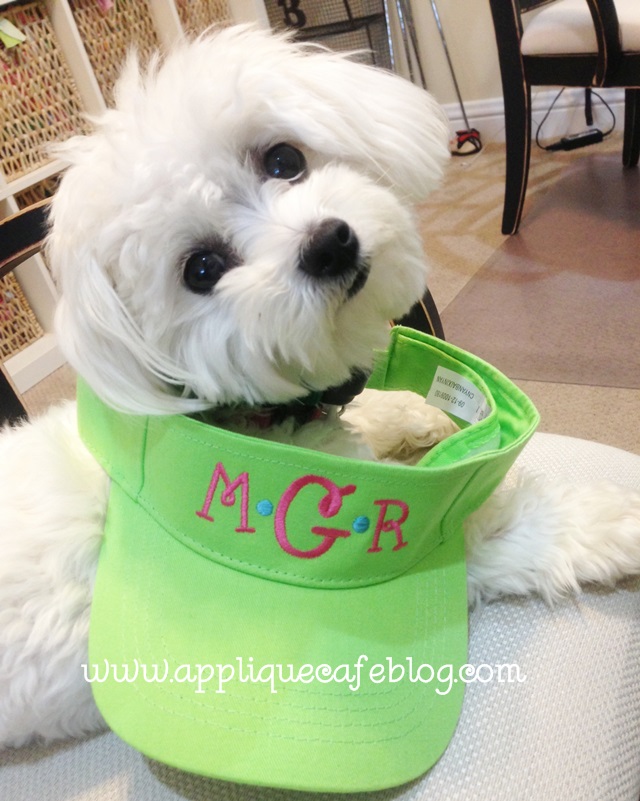
And here are my 3 kiddos in their summer visors!! I used MWP Natural Circle font on the boys and MWP Happy on Mallory’s other visor.

photo 5

Comment or email me with any questions! If you are familiar with the cap frame and visors then hopefully this will make sense and help! Recap: save your monogram upside down for visors AND clamp the stabilizer on your cap frame, then pin the visor to the stabilizer!

Summer

It is officially summer at Applique Cafe! My kids finished school on Friday and we spent the weekend at the lake through Monday. Yesterday was officially the first day of our summer, and today we christened the neighborhood pool for the first time. For some reason it doesn’t really feel like summer to me? Other than NOT having to get up early, pack any snacks or get anyone dressed for school, it doesn’t feel like summer. I think this past school year flew by so quickly that it hasn’t hit me yet!

After doing about 24 graduation towels in the past couple of weeks, here are a few things I’ve been working on. Below is an outfit I did yesterday (the shirt part of the outfit) for our cute little neighbor who is turning 2. She loves fish, so I went with our Girly Fish design. The top and knit shorts, which are adorable, are from Monkey Tails Blanks. MTB is based out of Montgomery, so when my neighbor asked for recs on a cute top or dress to wear, I sent her to their website. When ordering, you can also order a swatch of fabric to coordinate your appliques with your bottoms. I honestly wasn’t sure how the stripes would look on a fish design, but I love how this turned out! Knit is suprisingly easy to work with and I use Heat N Bond Lite on it which fuses the knit to my shirt and the outcome is a clean crisp applique. Font: Monogram Wizard Plus “Happy” (my absolute fave for girls).

photo (2)

I do monogramming for a local gift shop, and today on the machine I had a semi large cooler bag to do. My machine is typically on a 1 file drawer piece of furniture, and this is the second time in years that I’ve needed a real multi needle machine stand. The cooler was a bit too bulky to cram under the machine, so I straddled my machine on my stand and my tool chest. It worked! I watched it the whole time holding my breath, believe me!

photo (5)

Yay! (Monogram Wizard Plus “Curly Q” font)

photo (7)

Other than the above, I have a short list of old designs that I’m re-sewing. Sometimes sewing a design with new fabric brings it back to life! Here’s our Sea Turtle, which is like our 113th design (we now have close to 800 designs on our website).

sea turtle 500

Our Simple Turtle, #102.

simple turtle 500

Slide (#140)

slide 500

Our Snail, #91!

snail 500

I have a few more I’m working on, doing a couple each day. The above multi dot fabric used in the Sea Turtle and Snail is from Alfie & Bettie, Gumballs Pink. It’s super cute and I’ve been asked several times what it is.

Here are several cute new fabrics I got from TJ’s Fabrics. The small quatrefoils are from Fabric Finders. The larger quatrefoils are Riley Blake! I really like the colors on the larger quatrefoils and can’t wait to use them! Someone asked if these were replacing CHEVRONS! Not sure, but they are cute!

photo (8) photo (9) photo (10)

I will close with several pics of the kids, including MAGGIE, from this past weekend and the end of the school year! Yes, those are real ducks. Our neighbors at the lake bought and raised them in St. Augustine, FL and brought them to the lake this past weekend to release them. They were fun to watch! Have a great rest-of-the-week!

photo (11) photo (12) photo (14) photo (15) photo (16) photo (17)

Almost Summer!

Good afternoon! We are counting down to Summer around here! My kids get out of school next Friday, May 23rd! A couple of weeks ago I made the trip down to Ruthie’s Notions in Baker, Florida to teach a Basics of Applique class (my usual topic). I was there for 2 days, and managed to snap 3 whole pictures. Below are some samples that I have sewn (or appliqued or monogrammed)  and took to show. Everyone just LOVED all of the blanks! These are all Applique Cafe designs of course. I believe all of the monogramming is Monogram Wizard Plus “Master Circle” font.

photo (36)

More monogrammed and appliqued items! I am obsessed with the colors in this bag!! It’s a coral-y peach color monogram (Monogram Wizard Plus “Master Circle” font) on a “spa” colored jute bag, which came from a local store that I do monogramming for. The towel and bag were both Mother’s Day gifts for my mom! 🙂

photo (37)

I also took lots of awesome blanks that I did not get a chance to stitch! Again, everyone went crazy over all the blanks! There is a list of blanks suppliers here on my blog – click HERE (in LINKS).

photo (38)

Here are several new designs we will be listing later today! I love Bird designs! You could also put fabric under the nest stitching and make it raggy (fabric + flannel). blog birds closeup blog birds

This is a great one for the boys! We live near Lake Martin (Alabama) so we spend a lot of time on a Pontoon Boat! These are my favorite colors for summer {after the spa/coral color combo}!blog boat

This Pontoon Boat was sewn by Glenda at That’s 2 Cute. Find her on Facebook! She added some ric rac for the water which is adorable!!

blogthats2cutepontoon2

This is our new Mini Raggy Oval Patch, which can be sewn on anything. I typically use a layer of flannel (white or any color) underneath my fabric for raggy designs. You simply trim, leaving about 1/8″ around (give or take) and then scrape with your scissors to create the raggy effect. For this VISOR, I stitched the patch on a medium weight tearaway stabilizer. I hooped the stabilizer, then sewed the patch on to it just like any applique (fabric + white flannel). I then trimmed around the patch, pulled away the stabilizer and glued it to the visor using Fabric Fusion fabric glue. You could also stitch this on using a cap frame/cap hoop if you have a multi needle machine. blog visor

Here is the same patch on a pair of cute lounge shorts. These were sewn by Glenda at That’s 2 Cute (custom monogramming and appliques). Precious!!!!!blogthats2cute

This is Whale 4 stitched on a Blanks Boutique onesie. Their onesies snap up the back, which makes it super easy to monogram and applique! I was able to get a 5×7 design on this onesie.

blog whale

Again, here’s That’s 2 Cute’s version on a cute pink Monag dress. Remember my post about Pic Monkey? That’s what she used to add the “water” overlay on the photo!

blogthats2cutewhale

We are working on getting these listed as I type! In case you didn’t know, all designs are on sale through tomorrow, Wednesday, May 14th! www.appliquecafe.com Have a great day!!

IMG_8865