Get Organized!!

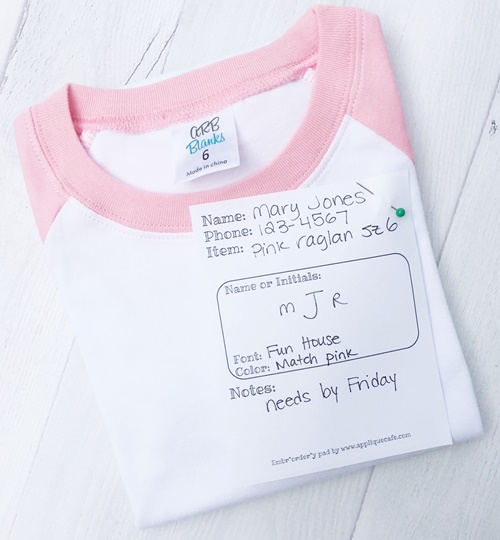
Happy Almost-May! How did we get here? School will be out in a matter of weeks and it’ll be SUMMER! So I had an idea several months ago about something new to offer my Applique Cafe-ers. I LOVE a notepad. I have a list going for things to do today as a matter of fact (return dress I bought to Target, Bank, B-day gift, Grocery Store, etc) and I love to cross through what I’ve done. So I love a notepad, but am sometimes not so good at using one when someone brings me something to monogram. Or I can’t find one and end up using a sticky note that falls off. I think I can remember what they want. It’s easy… bubblegum pink thread, initials mGr in the Fun House font. 17 minutes later I usually will have forgotten what color [Did she say bubblegum pink or hot pink?] or which order the initials were in. Did she say Fun House or Party Time? Hence…..

Why not create a notepad for embroidery orders {monogram orders + applique orders}… so that’s what I did. It’s been a long process of trying to find the right company to print them, then figuring out exactly what information I would want to include. It took me probably 2 weeks just to decide which sizes I wanted to offer. What’s the best backing for the notepads? So many options!! Then another month finding the other pieces of the puzzle. I need Thank You stickers. I need poly bags to ship them in. What about mailers? What’s the best way to do postage? How do I even charge shipping on 2 items when everything else on my website is a digital file? Several months later…. I think I finally figured it all out and the notepads went “live” on my site yesterday. I had my first 2 orders in a matter of minutes so I wanted to share here too!

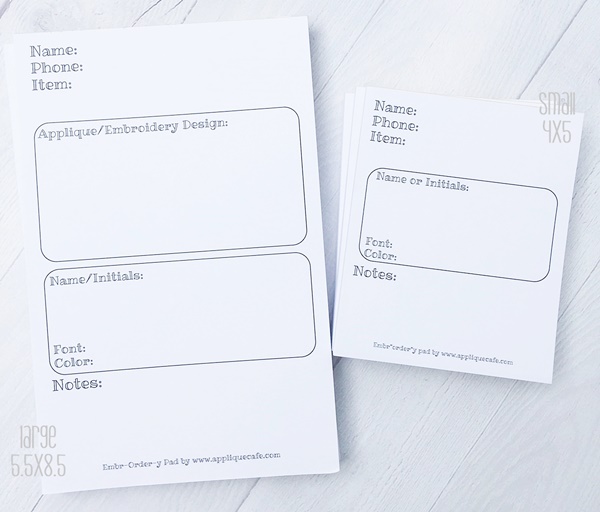
I decided to offer 2 sizes since some people do only monogramming and would only need the 4 x 5 pad. For applique and/or embroidery design orders, the bigger 5.5 x 8.5 pad with space for more information is perfect. Each pad has 50 sheets!

When you do the math, being organized and keeping up with your orders only costs you cents per order. Fill it out and pin it to the item! If I charge $10 to monogram a towel, then it’s worth 15 cents to know exactly what goes on that towel!

You can check them out on my website ~ our Embr”order”y Notepads are featured on our home page at Applique Cafe. Cheers to being more organized!

Craftsy Classes

It’s less than a week until Christmas! I had a monogram-a-thon last Thursday and have several more items to finish up for customers this week. I haven’t posted about Craftsy in a while and got an email that all of their classes are on sale through 12/26/15. Search “Craftsy” on my blog to see which classes I’ve posted about, including Embroidery and Photography classes. Click on the photo below to see if there are any classes you might be interested in. Once you buy a class you can watch it any time, as many times as you’d like. The Jewelry class looks fun to me! 🙂 affiliate_1200x1200_collage1

Applique Cafe is an affiliate of Craftsy!

Covering a Monogram

Just a quick post this Sunday! One of my longtime customers brought me a little jon jon last week and asked me to cover up the monogram that was originally on there (that she had picked out). The photo below is very light so you may not be able to see it all that well. She did a good job of removing the old monogram, but did cut the jon jon in one tiny place. She patched it, so I just needed to cover the monogram with an applique as best as I could. Her suggestions: our Sailboat or Sailboat Patch (I chose Sailboat 2) or our circle patch with new initials. All good choices!

IMG_8814

I decided to give our Sailboat 2 a try, and to make sure it would cover the monogram, I printed the 4×4 design on paper in Sew What Pro using the PRINT feature. It basically prints an image of each step and a final stitchout of the design. I cut around the design and even in between the sails and the bottom of the boat. I was then able to place the “design” on to the jon jon and SEE if any of the old monogram would show through. It covered it pretty well, and I got the design in the right position to cover up the monogram while being centered on the jon jon.  The jon jon had a center seam going down the front of it, so I used that as my horizontal center.

IMG_8815

Gridlines also printed on my design, so I was able to get the sailboat in good position and stick a pin through where my center should be. I then lifted the paper away and marked my center using an air erasable marker. You can see the mark on my first photo above.  I hooped the jon jon and lined my needle up with the center mark and sewed the design. (As you can see below, my pin is slightly right of the center mark on the grid. I wanted the center seam of the jon jon to line up with the center of the pole of the sailboat so I lined it up that way.)

IMG_8816

It turned out perfect, and the monogram was covered!

IMG_8817

My customer has 3 grandsons, so it’s great to be able to re-use custom made outfits such as this!

IMG_8821

Here is another blog post on covering a monogram: click HERE or on the photo below! Sometimes you are able to remove an old monogram cleanly and just re-monogram over it. If the monogram is too small or tight and impossible to remove (or if you cut a hole in the garment like I’ve done many times), then I suggest you take out what you can, and cover it with an applique! We have tons of PATCH designs that work well.

fish


Stay tuned for my next post on a new discovery I found!! If your monograms or appliques get “loopy” every now & then, you will want to read the next post!