Happy 2013!!

 Happy New Year!

photo (17)

Happy New Year ladies and gents!! It was a looonnnngggg…. Christmas break. My kids were out of school for well over what seemed like a month 2 weeks. We had a very relaxing break and school has now started back for 2 out of 3 (3rd starts back tomorrow). It’s nice to have some routine and normalcy back. Jeff was off work for a while over the break too, so we got lots of new designs done. Here are the ones just listed today, and I’m quite fond of the Carrot Trio and the Loopy Giraffe (if I do say so myself). These are all featured on our home page!

bunny 4 300-horz

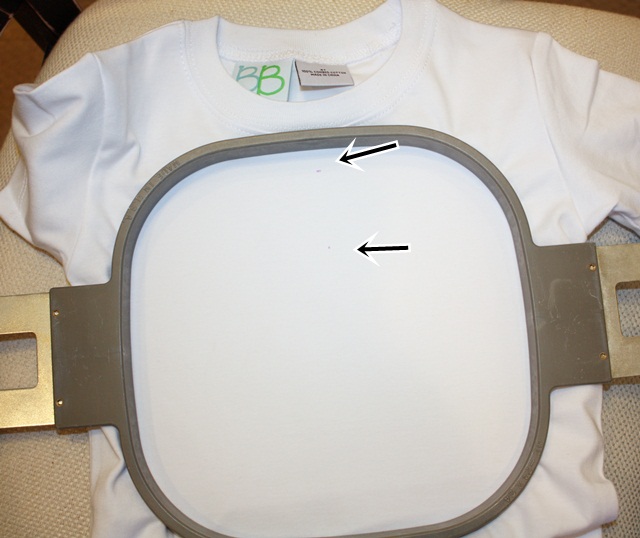
This past week I did some work for a local clothing designer (PBJ ~ Pieces by Jola). She brought over a couple of Blanks Boutiques shirts which are great! She was very specific about the location of the applique (1″ to 1.5″ below the neckline). I’ve never paid much attention to this with the way I hoop and do my shirts, but I snapped a picture yesterday so I thought I’d share. The idea is for the applique NOT to end up on the belly area of the shirt, which happens if you hoop too low. So, for these I marked my center from armpit seam to armpit seam (which is usually an even number – 14″, 13.5″, etc). I also made a mark on my shirt around 1″ from the top neckline. I then moved my needle to the top placement on my machine (should have taken a pic of this) and got it as close as I could. Here I’m using a Durkee 9×9 hoop which is great for multi needle machine users. It allows you to do a 5×7 design that might fill up a 5×7 hoop PLUS a name underneath!

IMG_7082

Here is the finished product, and as you can see the shark‘s top fin is probably about 1.25-1.5″ below the neckline. I love this design! I use Monogram Wizard Plus “Tipsy” for the name Aaron.

IMG_7084

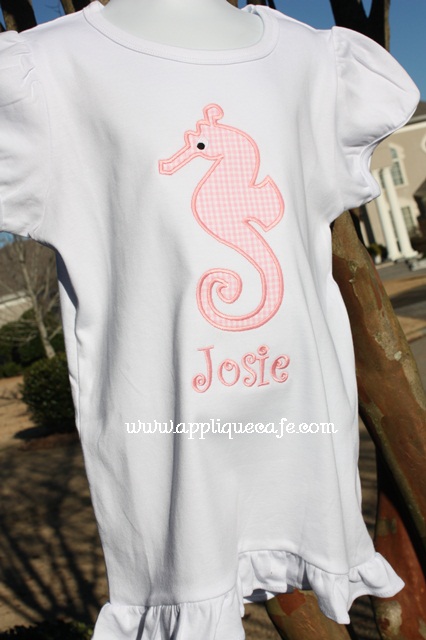
I also did this girl shirt with our Seahorse design. Again, good placement of the design on the shirt and I love these SIMPLE one fabric designs. They stitch out so quickly and easily! Jola is a clothing designer, so she has certainly made cute bottoms to go with these tops! Below I used Monogram Wizard Plus “Party Time (aka Curlz)” as my font. Again, a Blanks Boutique top. The shirt seems really LONG in this photo. It was a size 6 and the wind was blowing!

IMG_7087

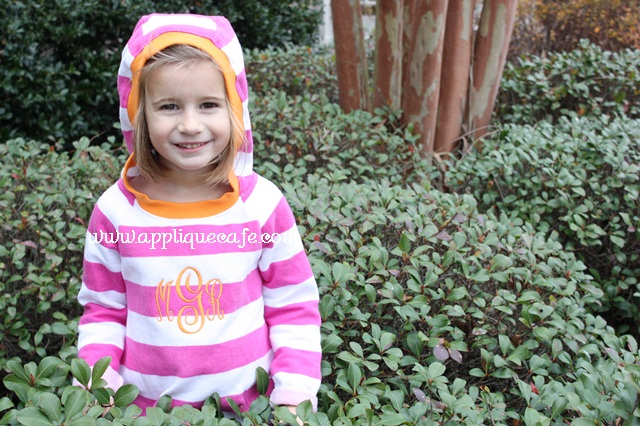
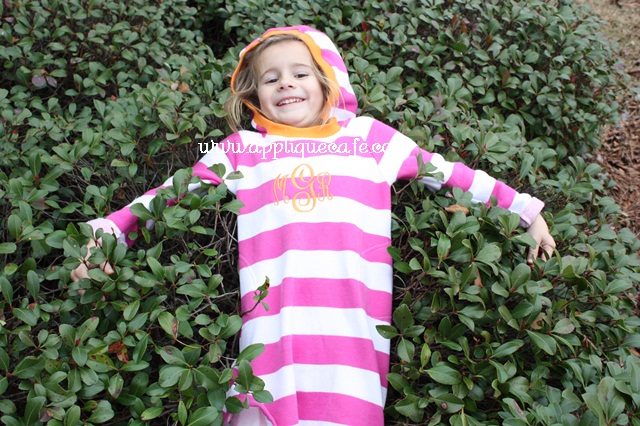
In my last post I showed you this cute Old Navy hoodie dress Mallory got for Christmas. As I was outside taking new design pics today she decided to get in the bushes and pose. I love this dress! It’s super soft and I love the colors. She wore white cableknit stockings and some matching pink sparkly Keds to school today with it. I would love some orange leggings but haven’t found any yet. This is Monogram Wizard Plus “MC Center” font which is a new favorite. It’s a “sister font” to Master Circle which is more of a rounded monogram.

IMG_7091

I love this girl! She was actually taking a break from playing soccer with her brothers and 3 other boys from down the street. She’s going to be TOUGH!!

IMG_7094

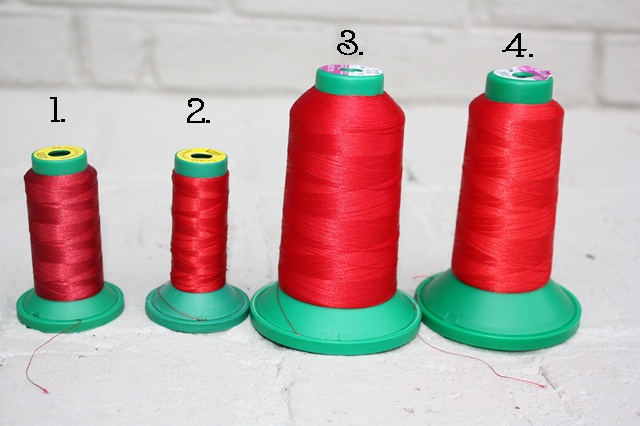
I mentioned in my previous post thread colors, so today I decided to do my reds. I was going to take some pics with some of my red polka dot fabrics, but I was afraid that would be too confusing and lead to too many questions! I use #3 and #4 90% of the time, probably because they are 5000M spools. Here they are L to R:

1. Exquisite ES213 ~ this one is borderline burgundy

2. Exquisite ES3015 ~ I would say a deep red

3. Isacord 1904 ~ Again, deep red, but not too dark (I probably use this one the most)

4. Isacord 1704 ~ I would say cherry red

I get my Exquisite thread from www.kenssewingcenter.com and my Isacord from www.sewingmachine.com! I would say 2 and 3 are very similar being different brands.

IMG_7097

Mark your calendars if you are “local” ~ I’ll be doing a class at Beth’s Heirloom Sewing in Wetumpka, AL on Saturday, February 2nd! I’m planning a trip up there maybe this week to make some notes and start working on what I’d like to teach/share. The class will be held that morning from 9:00 to 11:30 AM and will cost $35. You can find Beth’s on Facebook ~ HERE! More info will be in their January newsletter or you can call them for more details!

Flush…

Good afternoon! I haven’t posted in a while and I’m so sorry! It’s hard to sit down and put two thoughts together these days. I have some great new fabric and a giveaway post that I’ll work on for later this week. I’m apologizing in advance for this post. It deals with mice and toilets!! That brings me to my first photo. This pretty much sums up our daily challenge around the Gulledge household. We have a 6+ year old who doesn’t deem it important to flush the toilet. Jeff has sat all 3 kids down on numerous occasions to discuss flushing, the pros and cons, how to, etct. His sit-downs don’t seem to be working for our precious middle child we refer to as “G”. Last week he (G) thought it was a good idea when we proposed (jokingly) that he write FLUSH 10 times on paper to help him remember.  We then decided to hang it on the wall for further enforcement. It seems to be working! Although I haven’t been upstairs in a few days… Looks like we need to refill the TP too…

We had a 4 day holiday weekend this weekend, so we took a little family vacay down to Orange Beach, AL. The weather was amazing and we had a wonderfully fun weekend! Nothing really exciting happened, but we had some great eats and some fun on the lazy river. I won’t mention the football watching (Auburn = boo).


While in OBA, we spent some time Sunday at the park. As a bonus we got to walk around the Scarecrow Fest which was really cool! It appeared as though different businesses decorated a scarecrow and we took a few pictures of our favorites. This one is of the scarecrow who is *scared* of 3 crows that were perched on top of the cross. You may not see them well in the photo. This one won a ribbon.


There were 2 rows of scarecrows in a big U shape, so tons of them!  Everything from Santa Claus to Mickey Mouse and some I didn’t understand.

This was a scuba scarecrow and also won a ribbon.

This one also won a ribbon and was Sissy’s favorite!

 Now to our other latest battle aside from getting G to flush… I noticed a week or so ago a little something on my desk. It looked like a piece of pencil lead. I threw it away and then thought nothing of it. A night or two later I was woken up a couple of times during the night and *heard* noises. I thought it was our ice maker and again, thought nothing of it and didn’t get out of bed to see what it was. The next morning I decided to investigate and low and behold, I see a drip of something on my desk (tee tee I presume) and also see another pencil lead on Jeff’s desk. You guessed it, a MOUSE!! Luckily our pest control guy came that day and confirmed that my pencil lead was indeed mouse poop. He gave me 2 mammo-jammo XXL glue traps to go along with the 6 I purchased earlier that morning. For at least 4 nights we left the sewing room armed with these glue traps and got nothing! One morning I even found a pencil lead in front of my keyboard, as if to say “HA HA POO ON YOU”!!!! After several days of nothing, we forgot about the mouse.

Here are all of our traps with cheese. 8 booby traps in all. Do you know how much trouble it is to do this every night? We couldn’t leave them during the day for fear the kids would get themselves stuck.

We had 2 per desk and then one on each wall.


The mouse was forgotten. We went out of town this weekend and thought nothing of him. Didn’t even leave out a trap! We assumed he had moved on. Yesterday afternoon as I was unpacking from our trip, I was in the bathroom headed to my closet and A MOUSE RAN RIGHT BY ME!!!!!!!!!!!!!!!!!!! I screamed several times (loud enough for him to freeze in his tracks). When I say I screamed, I mean I screamed the loudest I’ve screamed in a loooonnnnngggg time. He then ran to the wall in our bedroom by the door and froze again (and pooped). Jeff was “on the other side” with the kids behind him so he lined up the glue traps in the doorway and passed me a broom and I was able to shew him through the door and on to the trap. VICTORY!!!! I will spare you the pic Browder took with his Ipod and I will say, Mallory’s response was “awwwww he’s cuuuuuute”!!!!! They also said his legs were crossed on the trap.

Of course now I am super paranoid thinking every lego on the floor is a mouse and turned the light on in the bathroom all 4 times I had to get up last night. I am hopeful he doesn’t have a friend or relative and I can only imagine the “Open Mouse Party” that might have been held here this weekend while we were away. Anyway, mission accomplished… for now. We live next to an empty lot, so I assume that is where he came from. Not exactly sure how he got inside.

Not much else going on around here. I have some great new fabric and a fabric giveaway I hope to post by the end of the week, so stay tuned for that. Oh… a few more photos…

Last month our friends at Lake Martin Voice Realty  helped us celebrate 10K Facebook fans! Sadly this was the only photo I got from the evening, which included a cab-van ride to downtown Montgomery and a fabulous dinner at Central! You don’t see a lot of cabs in my neighborhood, or Montgomery for that matter, so it was interesting in itself. It was really a fun evening and we appreciate John and Palmer for making 10,000 fans such a big deal! There are lots of other sites who have double that or even more, but we like to think we got ours the “organic” way without paid ads and massive fan drives. We’re amazed every day to see the new fans pop up on our page and we hope they are enjoying our designs as much as we enjoy making them! BTW we are now up to 10,717, but who’s counting!!

 Here are a few pictures sent to me from Erin at The Clutch Boutique. She wanted to share how she “tacks” down bows on her appliques so you can’t see the stitching. She uses the “button sew” feature on her sewing machine and is able to tack down each side of the bow under the middle piece. Her customers love it because it not only keeps the bow in place but both layers are sewn together so the little darlings can’t pull it loose.

 I’m not sure how she ties her bows or what kind of sewing machine she has. This is just her suggestion if you have a sewing machine w/ a button sew feature! BTW this is the Applique Cafe Ghost Patch design!

 Looks great! Cute font too! I have emailed asking what the font is and will update that as soon as I hear from her! Update: Font is Carmen from www.8clawsandapaw.com!

Have a great rest of the week!

Monogram Wizard Plus and Sew What Pro

mwp

As promised, I have another trick I learned on the Monogram Wizard Plus Facebook Page. This is great in 2 instances that I can think of off the top of my head. 1) You’re doing a name in Monogram Wizard Plus and you or your customer wants each letter a different color thread. You can do one of a few things ~ if it’s a name with 5 letters or less, you can do it in layers in MWP. You could also manually stop your machine as it’s sewing in between each letter and change your thread color (if you are using a single needle machine). OR….. here is a neat trick! Between each letter, type in the “^” symbol, which is located on your 6 key. Another instance where this comes in handy is 2) You’re using “Specs” font (MWP) and if you have Specs, you know it is spaced all crazy so your name may or may not line up the way you want it too. I LOVE Specs and it’s great for monograms (3 letter monograms). Names are another story. Anyway, you can use this trick to rearrange the letters IF you have Sew What Pro or other editing software. First you will save it this way (there are more pictures below) and then you would bring it up in SWP to edit. 

 Here is the key!

 Here is my name with the ^’s in between each letter and this is Specs font. As you can see it’s all crazy! But, when you put the ^ in between each letter, it makes each letter a different thread color. Normally in MWP your name or initials are all the same color UNLESS you layer. So I’m going to save this on my computer in a folder where I can find it in a minute to edit in SWP.

 Here it is in Sew What Pro. If you look at the thread chart on the right you can see all 7 letters are a different color and a different step. If you click on each thread color, you can then move the letter around. It’s a little tricky since when you select a letter it only shows you that letter to move, but I was able to line the letters all up on the middle line pretty easily. There may be another way to do this, but I’m not sure what it is. If you know, comment and let us all know!

 As you can see here I clicked on thread color 1 on the thread chart which shows me my “M”. If you click on the name on the left part of your screen, it will select the whole name, so you have to click on each thread color to select each letter. What I did was line up the M on the middle horizontal line on my grid. I then clicked on step 2, the “a”, and lined it up on the middle line next to the M, then 3, 4, 5 and so on until all the letters were sitting on the line. I did have to go back and adjust them a little to the left and right, but it didn’t take me long at all.

 Here is the name after I’m done and I’ve clicked the “CENTER” button to center the name in my hoop. I will then save the name to my machine and it’s ready to sew. Again, since each letter is a different color it’ll stop in between each letter if you want to sew the name with different color threads. If you don’t, you can change each letter to the same thread color and JOIN THREADS to have the name sew all the same color. Or, you could just keep sewing after each stop using the same color thread. I did not take pictures of the joining threads part but will try to do so later. I didn’t want to get too confusing!

 I also found a couple of neat features in Sew What Pro that I don’t really use but I thought I’d share. If you click Options, then File Associations, you can select all the different type of embroidery files you might open on your computer. That will allow you to double click on those embroidery files and Sew What Pro will automatically open them. Otherwise, your computer might ask you what to use to open the file.

 I clicked most of the embroidery file types we offer, so now I can open any of those files in SWP automatically! I like to SEE what I’m working on, so I use SWP whether I am merging or editing or not. My machine uses PES and DST, but we often have to look at other file types so this is great! It’s also a great little cheat sheet as to what formats the different brands of machines use!

 Another feature I have never used is Edit, Order Threads. (And you can see Join Threads down below that). You can switch around the order of whatever you are sewing with this feature. I would be careful in doing this, but it may be you have a design with a name and maybe you want to sew the name (underneath?) first and maybe the way you saved it it was at the end.

 Again, I’ve never used this feature but it might come in handy one day! We like to order our designs in a logical order, but sometimes on single needle machines you can switch the steps around to make sewing it easier if you are using the same thread colors. Again, I’d be careful with this since most designs are ordered in a logical manner!

I get emails a lot asking “how do you do this?” in MWP and SWP. My suggestions is to open them up and just play around! When I started there was no Facebook Group (or Facebook for that matter) so I learned through the manuals and just experimenting and TRIAL AND ERROR! See Helpful Posts for more posts on MWP and SWP.

 Now on to the craft section of my post thank-you-Pinterest! My kids have a vat of Perler Beads I got at Ikea. We usually keep them hidden because they get them all over the floor and Jeff gets all crazy. I saw this on Pinterest last night so we had to try it out! This is an oven proof Pyrex pie dish. First I sprayed it with Pam (oil would work) and then wiped most of it off with a paper towel. We then layered the Perler beads on the bottom and on the sides in the best single layer we could come up with. They actually stacked on the sides pretty well thanks to the light grease! We put it in the oven at 350 degrees first for 10 minutes, then another 5 minutes. This is what it looked like after it cooked.Pretty cool!


 I then took it out of the oven and let it cool. I’d say 10-20 minutes. On this first one we put it in the freezer for 5 minutes or so and then the “bowl” came right out of the dish. We did 2 more later and skipped the freezer step and they came right out.

Pretty neat! I’ve also seen metal cookie cutters (put the beads inside and cook) and muffin tins. I’m sure we’ll be doing this again with every oven safe dish we can find!!

 Now on to a snack my grandmother used to make when I was little. It came to mind this week so I made some last night. You might think this looks funny but I promise it’s good! These are Ritz crackers with peanut butter (thin layer) and mini marshmallows on top.

I bake/toast them in the toaster oven until the marshmallows begin to brown.

Let them cool and then eat up!! Try them! They are really good!! I will always remember my grandmother when I make these!

The sale continues at Applique Cafe, and we’ll be listing 6 new designs probably in the morning!